Thursday, April 30, 2009

MEGA Omega Fish Nuggets

MEGA Omega Fish Nuggets
(makes 5 servings)

I've been really inspired lately to make foods that are nutrient dense...like, insanely nutrient dense. Jen's Smoothie is a very good example of this and is part of what is inspiring me. My other big source of inspiration is a book that Kara gave me called 101 Foods That Could Save Your Life by David Grotto. Its an A-Z book that lists 101 of the best foods for good health. While reading it I came up with the idea of making a nugget that contained 5 sources of either omega-3, 6 and 9 fatty acids. Here is a good article about why these fats are good for you and your family.

Ingredients
1 can (14oz) wild caught salmon (omega-3!)
1/2 tin (3.75oz) sardines packed in olive oil, drained (omega-3!)
1 Tbsp olive oil reserved from sardines (omega-9!)
1 egg (omega-6)
3 Tbsp. mayonnaise
2 Tbsp. flax meal (omega-3!)
1/2 c. seasoned or unseasoned bread crumbs (I used seasoned)
8-10 chives, minced (or cut into very small pieces using kitchen shears)
1 Tbsp. fresh lemon juice
1 Tbsp. lemon zest
1/2 Tsp. Old Bay seasoning
1/4 tsp. fresh ground pepper
Olive oil spray

1. Remove the skin and bones from the salmon.
2. In a medium bowl mash the salmon and sardines to a smooth consistency.
3. Add the remaining ingredients and stir until well combined and mixture is of a smooth and even consistency.
4. Spray a mini-muffin pan with olive oil spray. Fill with fish mixture.
5. Bake in a 375 degree oven for 15 minutes.
6. Remove from oven, cool and serve with fresh lemon and tarter sauce!
I also froze a bunch to reheat for future lunches/dinners. To do this I arranged the nuggets on a freezer safe dish lined with wax paper and froze for 1 hour. Then I divided the nuggets into individual serving containers and put back into the freezer.


Wednesday, April 29, 2009

MoV Day 17: Brussel Sprouts with Bacon

My husband hates two vegetables: cauliflower and brussel sprouts. So this has been a great two days for him! Last night was Day 17 of the Month of Veggies: Brussel Sprouts with Bacon. I was kind of bemoaning having to make these, not being a huge fan myself, when my friend Sharon mentioned that Ina Garten roasts brussel sprouts and they are fabulous. So I ditched Parents Magazine's suggestion of boiling them (but kept their suggestion of bacon!). I thought these were fabulous. And indeed, I ate almost all of them. Lizzy ate some chopped-up hearts of the brussel sprouts with gusto. Abby studiously ignored them while she ate the rest of the dinner, and not one single trick worked to get her to try a bite. Geesh. (and my husband had to mysteriously work late and grab dinner at his firm rather than at home - I guess he really wanted to avoid those brussel sprouts!)

The roasting gives the outside leaves this awesome crunch, and the bacon and kosher salt give them serious yum.

Brussel Sprouts with Bacon

1/2 lb brussel sprouts, rinsed and trimmed
1 Tbsp olive oil
1/4 tsp kosher salt
ground pepper
2 slices turkey bacon, chopped

Preheat oven to 400F. Toss the brussel sprouts in olive oil. Spread on a rimmed baking sheet and sprinkle with kosher salt and ground pepper. Roast for 25 minutes. Sprinkle the chopped bacon over the sprouts. Continue to roast for about 10 minutes, until the hearts of the sprouts are tender and the bacon is crunchy. Serve.

(and yes, this made a small portion, so adjust as needed for your crowd. But I suspected that these would not go over well, and I didn't want to be swimming in leftover brussel sprouts!)

Tuesday, April 28, 2009

Jen's Smoothie

Jen's Smoothie
(serves 2)

My good friend Jen has been making smoothies for her 2 kids for breakfast for a couple years now. Over the years she has been tweaking it and now she will brag (facebook status style) that she "makes a mean smoothie" and you know what? She really does. I had her send me the recipe last week and I've been making it for about 5 days now. I have done a little tweaking of my own just to suit our personal tastes but this smoothie is going to stick around this house for awhile. What I like about it:

-It is ridiculously chock full of vitamins, protein and healthy fats. What a great way to start a kids day!
-Its a way for me to get a full serving of leafy greens and 2-3 servings of fruits not only into Neko but also MYSELF!
-It really, truly, honestly tastes really delicious...promise.

Ingredients:
2/3 c. goat or cow kefir: plain or flavored
1/3 c. vanilla yogurt
1/2 c. orange juice (100% juice)
1c. frozen fruit: blueberry, raspberry, strawberry, mango, or peach are good ones to try (today I did a combo of frozen strawberries, mango and blueberries. Also this week I have used frozen Acai berry packets which are delicious and super duper good for you!)
1 Tbsp. healthy oil - I used a flax/sunflower blend but even olive oil would be good
1 heaping spoonful of almond butter
1-1/2 c. of some sort of leafy green--baby spinach, red or green kale, red or rainbow chard (I've been using red chard this week)
1/2 large banana

Add all ingredients to blender. Blend until smooth. Add some milk or more juice if smoothie is too thick. Blend again until desired consistancy. Serve!

Ingredients that Jen includes that I left out are:
-3/8 tsp. evening primrose oil (I omitted because I'm not sure what its for. Knowing Jen its for something good but I didn't take the time to find out what.)
-3 tsp. liquid minerals
-powdered kids multivitamin...either 2-3 rainbow light packets or 1-1.5 kids Emergen-C multi
I left out vitamins/minerals because Neko takes a multi, an omega-3, an immunity booster and calcium all in gummi vitamin form.
-electrolytes

I took a video of Neko enjoying her smoothie to prove its goodness! :o)

MoV, Day 16: Roasted Cauliflower

What? Day 16? Yes, I'm totally skipping Day 15 of the Month of Veggies, Cheesy Spaghetti Squash. I checked two grocery stores and came up with zero spaghetti squash, and I'm thinking it's really the wrong season for it. See you in the fall, spaghetti squash!

Last night we moved on to Day 16, Cauliflower "Popcorn". Cute title, but it's just roasted cauliflower. I thought maybe it would come out all crunchy like popcorn, but no. False advertising! I had low hopes, as my husband (who will eat anything) hates cauliflower, so what are the odds that my kids would like it? But in fact, Abby ate about half of her serving without me having to say anything. And you know who loved it? Lizzy! I couldn't shovel it on her plate fast enough! And that is why it's great to expose babies to all sorts of tastes - they're such willing little taste-testers!

Roasted Cauliflower

1 head of cauliflower, rinsed and chopped into florets
2 Tbsp olive oil
ground pepper
Parmesan cheese

Preheat oven to 450F. Toss the cauliflower florets in the olive oil and spread on a rimmed baking sheet. Sprinkle with ground pepper. Roast for 20 minutes, stirring halfway through. (Roasting cauliflower will make your house stink to the high heavens. Just a warning.) Sprinkle with Parmesan cheese before serving.

(see? she loved it!)

Monday, April 27, 2009

MoV Day 14: Honey Glazed Carrots

We're back from vacation, which means it's time to get chomping down our vegetables again! I'm not sure Abby ate a single vegetable while we were gone. Maybe a carrot or two. We were so busy being spoiled by family!

So for Day 14 of the Month of Veggies, we had Honey Glazed Carrots. This was a relatively easy sell, as Abby loves raw carrots and Lizzy loves baked soft carrots. Abby's not usually big on cooked carrots, and I must admit I don't force it - since she loves raw carrots, why try to force her to eat carrots that are glazed with honey and butter? But if you have a kid who needs convincing to eat their carrots, this would be a great way. I love cooked carrots, and these were right up my alley.

Honey Glazed Carrots

1 lb baby carrots
1 Tbsp butter
1 Tbsp honey
1/8 tsp ground ginger
dash salt

Boil the baby carrots to desired softness (I did mine pretty soft for Lizzy to be able to manage). Drain. In pot, melt butter and honey together. Add ginger and salt and stir for 2-3 minutes. Toss in carrots; serve.

Celeste has done something very similar to this dish in the past: Honey and Ginger Glazed Carrots (scroll down; they are part of the dinner date).

Thursday, April 23, 2009

Easter Leftovers Dinner Date!


First, I want to thank Kara for all her work taking care of our blog for the past month. I recently had a close family member pass away and just haven't had the wherewithal to think creatively for blogging purposes. I am very appreciative to Kara for keeping our blog active in my absence but also for being a wonderful, supportive friend to me during this hard time. You're the best! I'm back now though and have had some good ideas rolling around in my brain that I can't wait to share with you.

So speaking of playing catch up...

I had planned this dinner date to go up on the blog the week of Easter (before all your Easter dinners had been cooked) but Kara and Co. had the bad stomach flu that has been going around so we postponed it for the following week (and I'm only getting around to posting it now).

The idea was to come up with a creative way to reinvent and use up Easter leftovers. I decided to give my leftovers a Japanese spin and the result was delicious and actually pretty well received by the toddlers!

The meal...

Ham and Pineapple Skewers
(serves 4)
Ingredients:
Pre-cooked ham (I actually used a non-nitrate ham steak) cut into bite sized chunks
1/2 large fresh pineapple cut into bite sized chunks
2 Tbsp. honey
1 Tbsp. spicy brown mustard
1 tsp. sesame oil
wooden skewers, pre-soaked in water

1. Assemble alternating ham and pineapple chunks onto skewers
2. Line a broiler pan with heavy duty foil and turn the oven on broil
3. Combine the honey, mustard and oil in a small bowl
4. Put all the skewers onto the broiler pan and brush the sauce evenly over all the skewers.
5. Broil until the glaze on the ham starts to brown. Serve! Easy as can be!

Rice Balls
(serves 4)

These rice balls, also called onigiri are often found in those fun bento box meals. I hope to explore these little boxed meals soon on IBB as they are super cute and fun for kids!

Ingredients:
Sushi rice (must be sushi rice because the rice for these needs to be sticky)
2 stalks of asparagus
1 large carrot, peeled
2 tsp hoisin sauce
Gomasio
soy sauce for dipping

1. Cook sushi rice according to package directions. I made the 4 serving size.
2. While the rice is cooking, steam the carrot and asparagus for 5 minutes in a steamer or in a covered saucepan that has about an inch of water in it). Remove from steamer and let cool for 10 minutes. Dice both the asparagus and carrot into small pieces.
3. Mix the vegetables with the hoisin sauce. Set aside.
4. Line a small tea cup (or something similar) with a sheet of saran wrap. Scoop enough rice into the cup to almost fill it.
5. Using the end of a wooden spoon, make a hole in the center of the rice. Spoon in about a tablespoon of the veggies.
6. Bring up the sides of the saran wrap and, holding the ball of rice in the palm of your hand, twist the saran wrap closed.
7. Finish with the rest of the rice. Put all the rice balls onto a plate and refrigerate for at least one hour.
8. When ready to serve, remove rice balls from the saran wrap and sprinkle a little Gomasio on the tops of each ball. Serve with soy sauce for dipping.

Bunny Bars
(makes 8 servings)

So after Easter I had leftover sun drops from Neko's Easter basket, leftover marshmallows and coconut from a coconut lamb cake I made (see below!!) and leftover Annie's Organic Fruity Bunnies cereal that I used in some plastic eggs for her egg hunt. I decided to throw all these things together and boy was that a good idea!

Ingredients:
3 Tbsp. butter
3 c. mini marshmallows
5 c. Annies Fruity Bunnies cereal
1/2 cup flaked coconut
1/2 cup sundrops candy

1. Melt butter in a medium saucepan.
2. Add the marshmallows and cook over low heat until melted.
3. Stir in the remaining ingredients.
4. Press into a square pan. Cut and serve!

I meant to use those leftover plastic eggs to shape these into egg shapes but am trying to potty train Neko and she decided that she wanted to try a go on the potty right as I was stirring ingredients together. These things set up fast so I quickly pressed them into a pan and ran to the bathroom. Gah!

I hope you enjoy this little japmerican meal as much as we did! :o)

P.S. The lamb cake!

Wednesday, April 22, 2009

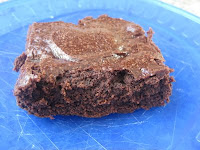
Fudgy Brownies

One of the hardest things to define is "healthy" eating. Is it low-cal? Low-fat? All homemade? Pre-packaged 100 calorie snacks? Trans-fat free? Raw diet? Vegan diet? South Beach?

For me and my family, "healthy" eating has meant a move towards "real" ingredients and away from ingredients developed in labs. I've taken this a step farther, lately, by making the final elimination of high-fructose corn syrup and artificial dyes from our diets. So whereas I always enjoyed baking from scratch, these days, it's pretty much a necessity.

In my quest to go HFCS-free, A Life Less Sweet has been an invaluable tool. She understands and explains the science behind it all, talks about the changes her family has made, and even taste-tests HFCS-free substitutions for former favorites. And the other day, she listed a recipe for her Favorite Brownies Ever.

A Life Less Sweet Brownies
(drool)

So maybe Favorite Brownies Ever aren't exactly healthy - but on the other hand, they are from-scratch and free of dyes, HFCS, and preservatives. I'm a brownie fanatic - and these are fantastic. Rich, deep, dark, and fudgy. YUM!

I cut the sugar down to 1 cup, but otherwise made them as directed. They were a huge hit with me and my playgroup buddies!

Monday, April 20, 2009

Five Tips for Trying New Foods

I'm on vacation this week - woo! - so no cooking for me! In this break from my Month of Veggies, I thought I would share my top five tactics for getting Abby to try new foods. They don't all always work, but usually at least one of them will!

1. A "two no thank-you bites" rule. Since Abby was very small, we have at least paid lip-service to this rule - Abby must take two bites of anything before she can say "no thank you" to finishing it. It is only very recently, as in after her 3rd birthday, that this has really set in. When she was younger, we would remind her of the rule, but not much would happen. Now, when she turns up her nose, I can usually just say "Abs, two no thank-you bites please" and she'll force them down. So with consistency, this rule is finally paying off.

2. "My turn, Your turn" I'll take a piece of the food off of Abby's plate and say "Okay, Mommy's turn first (eat it) Yum! Your turn!" Abby is usually game to try a bite once she's seen me do it, and we keep taking turns for as long as she's willing.

3. "You feed me, I'll feed you" Like "My turn, your turn", but I let Abby feed me with her fork and I feed her with mine. This usually gets lots of giggles, and she loves to feed me, so I can get her to go along with being fed herself.

4. "High Five" Abby is a high-five addict. So I'll count her bites on my fingers, and when she reaches 5, we High Five. She loves this one.

5. Bribery. Yeah, not my favorite option. I generally won't use bribery unless the bribe is a healthy treat I was probably going to serve her anyway - something like "Have three more bites of those potatoes, and then you can have grapes"

What are your favorite tactics to get a new food into an unwilling mouth? I'm always looking for new ideas!

Thursday, April 16, 2009

Butternut Squash-Gorgonzola Pizza

The girls were finally all well enough for us to have dinner date last night, and since Celeste was hosting, that meant I took a night off from the Month of Veggies. But since the guest of dinner date always brings a "reheatable", I made these frozen butternut squash-gorgonzola pizzas!

I got the inspiration for this pizza from LaDue & Crew's recipe for Gorgonzola and Butternut Squash Pizza. I thought it looked delicious, but I knew that great big chunks of squash and pear would be a tough sell for Abby. So I took it down to toddler level - but if you are just making this for adults? Try LaDue & Crew's recipe! (And then go drool over her other recipes... yum!!)

I was shocked at how much Abby and Lizzy both liked these pizzas. I worried that the gorgonzola might be a bit strong, but the squash is so mild that they balance each other out well. My husband and I loved them, too!

Butternut Squash-Gorgonzola Pizza

1 recipe Super-Easy Pizza Dough, prepared into 4 pizza shells
2 cups butternut squash puree (make your own, use frozen, or heck - use baby food!)
4 oz gorgonzola
1-2 tsp dried rosemary
salt & pepper

Spread about 1/2 cup butternut squash puree over each pizza shell. Top each with about 1 oz of the gorgonzola (it's a strong taste, so a little will go a long way). Sprinkle with a little dried rosemary, salt, and pepper.

To bake: Preheat oven to 425F. Bake for about 15 minutes, until crust is golden.

To freeze: Put each pizza on a wax paper-covered plate in the freezer. Freeze for about 2-3 hours. Wrap well in plastic wrap and store in freezer bags. To bake from frozen, preheat oven to 425F and bake for about 20-25 minutes, until crust is golden.

Wednesday, April 15, 2009

MoV Day 13: Fruity Salad


Last night was an easy victory - it was Day 13 of the Month of Veggies: Butterfly Salad. Abby adores romaine lettuce, grapes, and toast - and the "white dip" I made on the side was just the icing on her salad cake!

The only hard part? My homemade wheat bread kept falling apart when I tried to cut it into "butterfly" shapes. So we just broke it into croutons instead and scrapped the whole "butterfly" motif.

In other news - I received my brand-new crinkle cutter in the mail yesterday!! After all the comments about other people loving theirs, you know I just had to order one. So watch out, world, I'm going to be a crinkle-cutting fiend now!

Fruity Salad

Washed and torn romaine lettuce (Abby likes the rinds the best for their crunchy texture)
Red and green grapes, washed and cut into half or quarters
Whole wheat bread, toasted
1/2 cup plain yogurt
1/4 cup orange juice
1/4 tsp ground ginger
dash curry powder
dash cinnamon

Arrange a salad of lettuce and grapes. Cut the toasted bread into croutons and arrange on top.

In a small bowl, whisk together the yogurt, orange juice, ginger, curry, and cinnamon. Drizzle over the top of the salad, or serve on the side for dipping.

Tuesday, April 14, 2009

MoV Day 12: Teriyaki Green Beans

Last night we tried Day 12 of the Month of Veggies: Teriyaki Green Beans. Abby has always been kind of "meh" on green beans, but last night she cleaned her plate! Score!

The original recipe called for bottled teriyaki sauce, but we have recently eradicated all high-fructose corn syrup and artificial dyes from Abby's diet. So I made one up from scratch. The sauce made a lot more than I needed for the recipe, but I'll be brushing the rest of it over some baked chicken breast tonight. The sauce came together really fast, in the 5 minutes it took to microwave the green beans!

Teriyaki Green Beans

24 oz frozen green beans
1 cup + 1/4 cup water, divided
1/4 cup soy sauce
1/2 tsp ground ginger
1 clove garlic, minced
1 Tbsp molasses
2 Tbsp honey
2 Tbsp cornstarch

Prepare green beans according to package directions.

Combine 1 cup water, soy sauce, ginger, garlic, molasses, and honey in a small sauce pan. Begin heating over medium. Dissolve cornstarch in remaining 1/4 cup water. Stir the cornstarch into the sauce. Cook and stir until thickened and bubbly.

Toss cooked green beans with about 1/4 cup of the teriyaki sauce. Serve.

Monday, April 13, 2009

MoV Day 11: Breaded Asparagus

I wanted to serve asparagus with our Easter dinner last night, so it was a great time to try out Month of Veggies Day 11: Breaded Asparagus!

This is also the start of week 3 of the Month of Veggies plan: serve up a tasty sauce or dip. This should be a good week for us, as Abby looooves to dip stuff. She wants "dip dip" served alongside pretty much everything she eats. She had one and a half bites of asparagus, but then refused to eat anymore. Oh well. To look at the silver lining - she tried a bite!

Were I just making asparagus for adults who already like asparagus, I wouldn't bother with breading it. But I think this is a great way to make it look a little more fun and appealing for the younger set.

Breaded Asparagus

1 bunch asparagus, washed, trimmed, and patted dry
2 Tbsp all-purpose flour
2 eggs, well beaten
1/2 cup Panko bread crumbs
2 Tbsp grated Parmesan

Preheat oven to 450F. Line a baking sheet with aluminum foil and coat it with non-stick spray. Shake the asparagus and flour together in a zipper bag to coat. Make an assembly line of the asparagus, the eggs in one bowl, and the Panko and Parmesan combined in another bowl:

Dredge each stalk of asparagus in the egg, and then lightly coat with breadcrumbs. Bake on the foil-lined tray for about 15 minutes (more time for thicker spears, but the really thin asparagus would probably take more like 10 minutes).

I made a simple honey mustard to serve with this (2 Tbsp Dijon mustard to 1 tsp honey), but Abby didn't care for that and used ketchup instead. For her one and a half bites. Yup.

Saturday, April 11, 2009

MoV Day 10: Pumpkin Peanut Butter Soup

We were feeling better last night, so we moved on to Day 10 of the Month of Veggies: Pumpkin Peanut Butter Soup.

Yuck.

Pumpkin Peanut Butter Soup: Don't Try This At Home

I expected to like this. I love peanut butter, I like pumpkin just fine... but it was not good. Bland, too thick, and too peanut buttery. This might be okay as a sauce over some roasted pork or chicken, but it did not hold up as a soup.

To Abby's credit, she tried two bites before saying "no thank you". I didn't push it, since I didn't want to finish it myself!

Have a Happy Passover or a Happy Easter or just a Happy Weekend!

Thursday, April 9, 2009

Month of Veggies - Another Break!

The girls and I came down with an awful tummy bug yesterday, so needless to say, Pumpkin Peanut Butter soup was about the furthest thing from my mind!

So in the meantime, Abby and I are spending some quality time with Pedialyte. She's not a fan of the Pedialyte Ice Pops, which I can't understand - they are about the only thing that sound good to me right now! Of course, Lizzy is probably starting to wonder why my milk tastes like "blue raspberry" (and how did that ever come to be an acceptable "flavor"? Blue? Really?). We hope to be on the mend quickly and back to our veggie-tryin' ways!

Wednesday, April 8, 2009

MoV Day 9: Fiesta Corn

Fiesta Corn was on the menu last night for Day 9 of our Month of Veggies project. I rarely serve corn, so this was all unfamiliar (or oft-rejected) territory for Abby. In fact, dinner started out like this:

But since ignoring it didn't make it go away, we pressed on. I resorted to bribery - not my favorite tactic by any means, and not something I do often. Every once in a while, I just get tired of Abby refusing to try new things and will tempt her with a treat if she will eat up her vegetables (or whatever it is). I know it's not the best plan, but I'm also not perfect - and when my other tactics fail (taking turns, asking her to take two bites before saying "no thank you", letting her feed some to me), I will sometimes try it. I just want her to try new things - she often ends up liking them and eating them willingly the next time it's offered. Last night, it worked - she cleaned her plate and declared the corn "deeee-licious"!

This corn was indeed delicious. I added in some lime juice to the recipe, because I watch a lot of Top Chef, and Chef Colicchio is always on the contestants' cases if they don't add acid to their dish. I thought it added a nice bright flavor!

Fiesta Corn

1 Tbsp olive oil
1 large red bell pepper, diced
1 large green bell pepper, diced
1 1/2 cups frozen corn
Juice of 1 lime
1/2 tsp chili powder
1/4 tsp salt
1/4 tsp ground coriander

Heat olive oil in large skillet. Add diced peppers and saute over medium heat, stirring occasionally, until tender - about 3 minutes. Add in frozen corn. Saute until heated through. Stir in lime juice, chili powder, salt, and coriander. Cook for 1 minute more.

Tuesday, April 7, 2009

MoV Day 8: Sweet Potato-Parsnip Mash

Day 8 of the Month of Veggies called for a Sweet Potato-Parsnip Mash. Yum! I love mashed sweet potatoes, and the parsnip was a great addition! Abby tried a few bites (which is HUGE - she doesn't usually try anything mashed. Abby is picky, if I haven't made that clear by now...) and Lizzy gobbled hers down (with her hands!).

Sweet Potato-Parsnip Mash

3 large sweet potatoes, peeled and diced into chunks
3-4 large parsnips (aiming to have about half as much parsnip as sweet potato), peeled and diced into chunks
1/3 cup apple juice (or cider, when in season)
salt & pepper

Fill a large pot with about 1 inch of water. Add in diced sweet potatoes and parsnips. Bring water to a boil, and then simmer the vegetables for about 15 minutes, until very tender. Drain the vegetables and return to the pot. Add the apple juice and mash well. Add salt and pepper to taste.

Monday, April 6, 2009

MoV Day 7: Roasted Veggie Medley

We moved on to day 7 of the Month of Veggies last night: Roasted Veggie Medley. I LOVE roasted potatoes. I ate pounds and pounds of roasted potatoes while pregnant with Lizzy. Abby has always been iffy on them - one night she'll like them, the next night she won't - so I wasn't sure how this would go over. I thought the Parents recipe was going to make too small an amount, so I made a more generous portion to satisfy this potato-lovin' mama.

As it turned out, Abby tried one potato, and then gagged on a bite of butternut squash (and wouldn't touch a red bell pepper). Lizzy gobbled up everything - this is definitely a great dish to make for little ones who are learning to feed themselves. I had a great big bowlful and was in heaven! I have never roasted vegetables with balsamic vinegar before (I usually just do olive oil) and I loved the addition of that flavor!

Roasted Veggie Medley

2 large baking potatoes, diced into 1-inch chunks
1/2 butternut squash, diced into 1-inch chunks
3 Tbsp balsamic vinegar
3 Tbsp olive oil
1 tsp dried thyme
salt & pepper
1 large red bell pepper, diced small

Preheat oven to 425F. Line a rimmed baking sheet with foil. Whisk together the balsamic vinegar, olive oil, dried thyme, and some salt and pepper in a large bowl. Toss the potatoes and squash in the dressing. Spread vegetables on the baking sheet. Bake for 25 minutes.

Scatter red bell pepper pieces over the vegetables. Continue baking for 15-20 minutes more, until vegetables are tender.

Friday, April 3, 2009

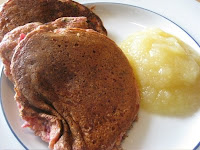
MoV Day 6: Zucchini-Beet Pancakes

We moved onto "week 2" of the Month of Veggies last night. The theme of week 2 is "mix a vegetable your kid likes with something different" and first up was these mini vegetable cakes. Now, I'm not sure which is supposed to be the veggie your kid likes and which is something different - zucchini or beets? They both seem a little out there. The original recipe called for, basically, just jazzing up a boxed corn muffin mix. I decided to start out from scratch!

Zucchini-Beet Pancakes

8.25 oz can of beets, drained and rinsed (or, 1 small roasted beet)
1 small zucchini
1/2 cup whole wheat flour
1/2 cup corn meal
2 Tbsp milled flax seed
1 1/2 tsp baking powder
3/4 tsp salt
1 egg
1 cup milk
2 Tbsp honey

Grate or chop the zucchini and beet together in a food processor (I wanted Lizzy to be able to handle these, so I basically ground the veggies together).

In a large bowl, combine the flour, corn meal, flax, baking powder, and salt. In a smaller bowl, whisk together the egg, milk, and honey. Stir the wet ingredients into the dry. Stir in the grated vegetables.

Drop by 1/4-cupfuls onto hot frying pan or griddle. Cook on each side about 1-2 minutes, until browned and cooked through. We liked our pancakes served with applesauce.


I quite liked these and will finish the leftovers for lunch today. I wouldn't say Abby hated them - she ate almost a whole pancake - but they definitely weren't something she'll be clamoring for. I thought their pink color would appeal more to her princess-loving self than it did! Lizzy, as usual, gobbled everything down with gusto.

If I want Abby to try zucchini again, I'll probably just stick with zucchini nuggets!

Thursday, April 2, 2009

MoV, Day 5: Crinkly Carrot Fries

We're back on track, and mostly feeling better! Last night we continued with day 5 of the Month of Veggies: Crinkly Carrot Fries. Apparently, I am the only person in the world who does not own a crinkle cutter, so we had boring old straight carrot fries (a.k.a., baked carrot sticks). These were delicious! I thought they'd be pretty boring, but they were great!

I forgot to take a picture, but I think Celeste might have gotten one. Mine didn't look as pretty as the ones on the Parents website, so it's probably for the best.

Crinkly Carrot Fries
(adapted from Parents Magazine)

1 lb carrots
1 Tbsp olive oil
1/2 tsp dried thyme
1/4 tsp salt

Preheat oven to 400F. Cut the carrots into 1/2-inch-wide sticks with a crinkle cutter (or, cut them into small carrot sticks, if you are a sadly crinkle cutter-less person like me). Toss them with olive oil, thyme, and salt.

Spread the carrot fries on a parchment-lined baking sheet. Bake for about 20 minutes, until soft. (If you are baking these for a smaller child, they would need to bake longer - these were too tough for 9-month-old Lizzy to handle.)